CSCE 211, Digital Logic Design
Circuit 3
Due: Tuesday, November 20, 2012
Goal: Add push button controls to your Circuit Project 2.
Required:
| Circuit project 2 | 1 |
| Push buttons | 3 |
| Resistors | 1-3 |
| Jump wires | many |
Cook Manual
Note: If you are in a Honors Section group or you are in a Regular Section group but implemented the extra LED requirement, please remove that part before you start as it is not used in this project.
Receive push button signal and debounce
When you test with the following tutorial, find some empty space on the board. Do not remove your project 2 design from the board as we are building on it.
This example demonstrates the use of a push button as a switch: each time you press the button, the LED (or any device associated with the button) is turned on (if it is currently off) or off (if it is currently on). It also debounces the input, which means checking twice in a short period of time to make sure it's definitely pressed. Without debouncing, pressing the button once can appear to the code as multiple presses. You can make use of the millis() function to keep track of the time when the button is pressed.
The code below is based on Limor Fried's version of debounce, but the logic is inverted from her example. In her example, the switch returns LOW when closed, and HIGH when open. Here, the switch returns HIGH when pressed and LOW when not pressed.
/*
Debounce
Each time the input pin goes from LOW to HIGH (e.g. because of a push-button
press), the output pin is toggled from LOW to HIGH or HIGH to LOW. ?There's
a minimum delay between toggles to debounce the circuit (i.e. to ignore
noise).
The circuit:
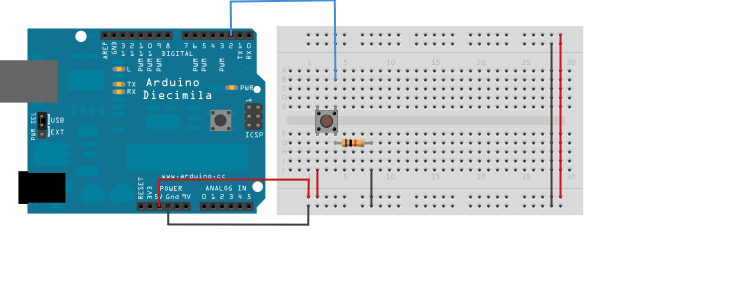
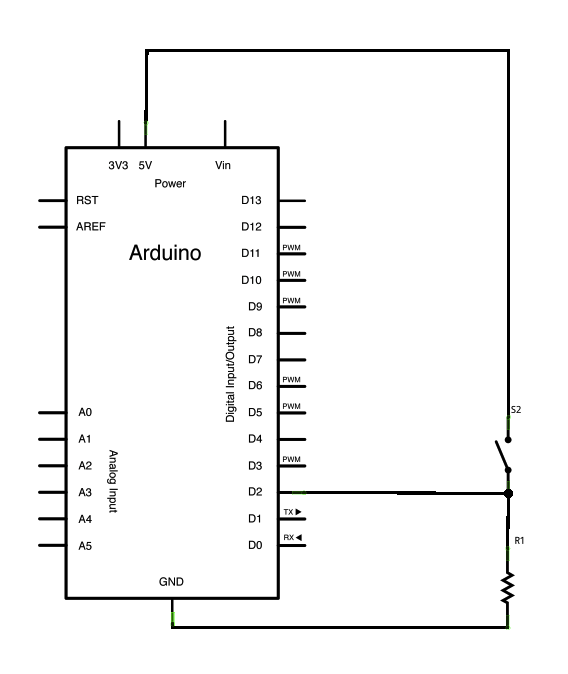
* LED attached from pin 13 to ground
* pushbutton attached from pin 2 to +5V
* 10K resistor attached from pin 2 to ground
* Note: On most Arduino boards, there is already an LED on the board
connected to pin 13, so you don't need any extra components for this example.
created 21 November 2006
by David A. Mellis
modified 30 Aug 2011
by Limor Fried
This example code is in the public domain.
http://www.arduino.cc/en/Tutorial/Debounce
*/
// constants won't change. They're used here to
// set pin numbers:
const int buttonPin = 2; // the number of the pushbutton pin
const int ledPin = 13; // the number of the LED pin
// Variables will change:
int ledState = HIGH; // the current state of the output pin
int buttonState; // the current reading from the input pin
int lastButtonState = LOW; // the previous reading from the input pin
// the following variables are long's because the time, measured in milliseconds,
// will quickly become a bigger number than can be stored in an int.
long lastDebounceTime = 0; // the last time the output pin was toggled
long debounceDelay = 50; // the debounce time; increase if the output flickers
void setup() {
pinMode(buttonPin, INPUT);
pinMode(ledPin, OUTPUT);
}
void loop() {
// read the state of the switch into a local variable:
int reading = digitalRead(buttonPin);
// check to see if you just pressed the button
// (i.e. the input went from LOW to HIGH), and you've waited
// long enough since the last press to ignore any noise:
// If the switch changed, due to noise or pressing:
if (reading != lastButtonState) {
// reset the debouncing timer
lastDebounceTime = millis();
}
if ((millis() - lastDebounceTime) > debounceDelay) {
// whatever the reading is at, it's been there for longer
// than the debounce delay, so take it as the actual current state:
buttonState = reading;
}
// set the LED using the state of the button:
digitalWrite(ledPin, buttonState);
// save the reading. Next time through the loop,
// it'll be the lastButtonState:
lastButtonState = reading;
}
Circuit Project Requirements
This circuit project will count for 4 points toward your final grade.
Regular section
You need to use one push button to switch the output format of the 7-segment display. Pressing the button each time will switch the output value from "temperature(F)" to "temperature(C)" to "humidity" and back to "temperature(F)".
Switching from "temperature(F)" to "temperature(C)" counts for 1 point.
Switching from "temperature(C)" to "humidity" counts for 1 point.
Switching from "humidity" to "temperature(F)" counts for 1 point.
No flickering of 7-segment displays counts for 1 point.
Honors section
You need to add 3 push buttons to control three different output formats separately. Assuming the buttons are labeled as 1, 2 and 3. Pressing push button 1 switches the output to temperature(F), pressing push button 2 switches the output to temperature(C), while pressing push button 3 switches the output to humidity.
Switching to "temperature(F)" counts for 1 point.
Switching to "temperature(C)" counts for 1 point.
Switching to "humidity" counts for 1 point.
No flickering of 7-segment displays counts for 1 point.